CodeIgniter4がリリースされました!
まだ公式サイトは準備中のようです。
CodeIgniter4のセットアップ
インストールをするには、composerまたはGitHubからとなります。今回はcomposerでインストールをしてみます。
composer require codeigniter4/framework は避けたほうが良い
composerでインストール、vendor/内部に生成されたファイルをプロジェクトディレクトリ内にコピーする方法も紹介されています。しかし、こちらはアップデートの度に手動でコピーする必要があり、また一部エラーとなる箇所があり、オススメしません。
# composer require codeigniter4/framework
Using version ^4.0 for codeigniter4/framework
./composer.json has been updated
Loading composer repositories with package information
Updating dependencies (including require-dev)
Package operations: 5 installs, 0 updates, 0 removals
  - Installing laminas/laminas-zendframework-bridge (1.0.1): Downloading (100%)
  - Installing laminas/laminas-escaper (2.6.1): Downloading (100%)
  - Installing psr/log (1.1.2): Downloading (100%)
  - Installing kint-php/kint (3.3): Downloading (100%)
  - Installing codeigniter4/framework (v4.0.2): Downloading (100%)
:
Writing lock file
Generating autoload files
# mkdir project-root
# cd vendor/codeigniter4/framework/
# cp -a app public tests writable env phpunit.xml.dist spar ../../../project-root
# cd ../../../project-root/app/Config/
# vi Paths.php
ディレクトリをコピーしたので、systemディレクトリのパスを変更する必要があります。
  // public $systemDirectory = __DIR__ . '/../../system';
  public $systemDirectory = __DIR__ . '/../../../vendor/codeigniter4/framework/system';
ローカル開発サーバーを起動
CodeIgniter4には、ローカル開発サーバーが付属しています。開発環境では以下のコマンドで起動でき、ブラウザで動作を確認できます。
# cd project-root
# php spark serve

CodeIgniter CLI Tool - Version 4.0.2 - Server-Time: 2020-03-14 03:13:52am

CodeIgniter development server started on http://localhost:8080
Press Control-C to stop.
出力にあるように、「Control」+「c」で停止できます。ブラウザで「localhost:8080」にアクセスしましょう。
Class ‘Kint\Kint’ not found エラーを修正
composer require codeigniter4/framework を実行した場合、ここでエラーとなってしまいます。

ログを確認すると、Kintクラスが無いというエラー。
# less project-root/writable/logs/log-2020-03-14.log // ファイル名は日付になっていますClass 'Kint\Kint' not found解決法はCodeIgniterのフォーラムに上がっていました。ファイル名を変更すれば解決します。
# cd vendor/codeigniter4/framework/system/ThirdParty/Kint/
# mv kint.php Kint.php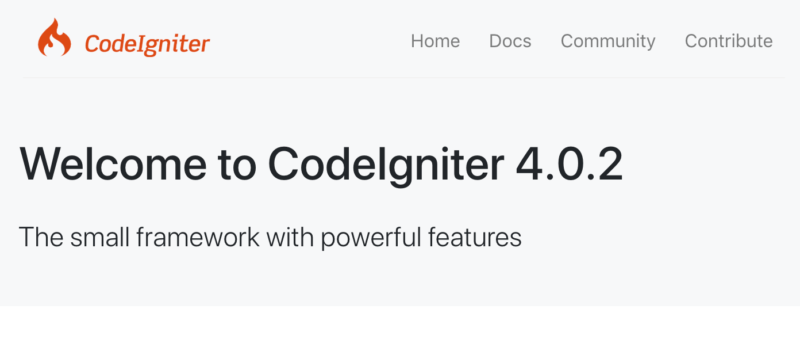
Kintは開発環境用なので製品版には影響がないのですが、起動するまでに手間が掛かったり、色々と面倒なのでオススメしません。
以下のcreate-projectを使う方法が良さそうです。
create-project codeigniter4/appstarter でスケルトンプロジェクトを作成
composerで空のプロジェクトを生成します。
# composer create-project codeigniter4/appstarter project-root
Creating a "codeigniter4/appstarter" project at "./project-root"
Installing codeigniter4/appstarter (v4.0.2)
  - Installing codeigniter4/appstarter (v4.0.2): Downloading (100%)
Created project in /var/www/app/project-root
Loading composer repositories with package information
Updating dependencies (including require-dev)
Package operations: 35 installs, 0 updates, 0 removals
  - Installing laminas/laminas-zendframework-bridge (1.0.1): Downloading (100%)
  - Installing laminas/laminas-escaper (2.6.1): Downloading (100%)
  - Installing psr/log (1.1.2): Downloading (100%)
  - Installing kint-php/kint (3.3): Downloading (100%)
  - Installing codeigniter4/framework (v4.0.2): Downloading (100%)
  - Installing mikey179/vfsstream (v1.6.8): Downloading (100%)
  - Installing sebastian/version (2.0.1): Downloading (100%)
  - Installing sebastian/type (1.1.3): Downloading (100%)
  - Installing sebastian/resource-operations (2.0.1): Downloading (100%)
  - Installing sebastian/recursion-context (3.0.0): Downloading (100%)
  - Installing sebastian/object-reflector (1.1.1): Downloading (100%)
  - Installing sebastian/object-enumerator (3.0.3): Downloading (100%)
  - Installing sebastian/global-state (3.0.0): Downloading (100%)
  - Installing sebastian/exporter (3.1.2): Downloading (100%)
  - Installing sebastian/environment (4.2.3): Downloading (100%)
  - Installing sebastian/diff (3.0.2): Downloading (100%)
  - Installing sebastian/comparator (3.0.2): Downloading (100%)
  - Installing phpunit/php-timer (2.1.2): Downloading (100%)
  - Installing phpunit/php-text-template (1.2.1): Downloading (100%)
  - Installing phpunit/php-file-iterator (2.0.2): Downloading (100%)
  - Installing theseer/tokenizer (1.1.3): Downloading (100%)
  - Installing sebastian/code-unit-reverse-lookup (1.0.1): Downloading (100%)
  - Installing phpunit/php-token-stream (3.1.1): Downloading (100%)
  - Installing phpunit/php-code-coverage (7.0.10): Downloading (100%)
  - Installing doctrine/instantiator (1.3.0): Downloading (100%)
  - Installing phpdocumentor/reflection-common (2.0.0): Downloading (100%)
  - Installing symfony/polyfill-ctype (v1.14.0): Downloading (100%)
  - Installing webmozart/assert (1.7.0): Downloading (100%)
  - Installing phpdocumentor/type-resolver (1.1.0): Downloading (100%)
  - Installing phpdocumentor/reflection-docblock (5.1.0): Downloading (100%)
  - Installing phpspec/prophecy (v1.10.3): Downloading (100%)
  - Installing phar-io/version (2.0.1): Downloading (100%)
  - Installing phar-io/manifest (1.0.3): Downloading (100%)
  - Installing myclabs/deep-copy (1.9.5): Downloading (100%)
  - Installing phpunit/phpunit (8.5.2): Downloading (100%)
:
Writing lock file
Generating autoload files
Generating autoload files
Generated autoload files
ローカル開発サーバーで確認
再度ローカル開発サーバーを起動してブラウザでアクセスすると、こちらはエラーもなく、welcomeページが表示されました。
.envファイルの作成
CodeIgniter4では、.envファイルを利用してサーバ固有の設定を行うことができます。envファイルが配置されているので、これを.envファイルとしてコピーし設定をしていきます。
# cd project-root
# cp env .env
envはサンプルファイルで、中身は全てコメントアウトされています。コメント(#)を外し、設定を変更できます。例えば、デフォルトではproductionモードですが、これを開発モードにするにはCI_ENVIRONMENTの値をproductionからdevelopmentに書き換えます。
CI_ENVIRONMENT = development開発モード
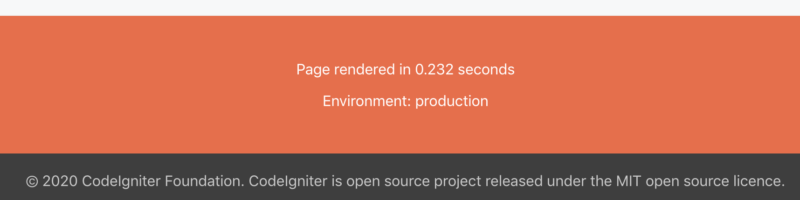
productionの場合。
developmentにすると、画面右下にボタンが表示されます。ただしこれはローカル開発サーバーを使用した場合だけで、developmentの状態でApacheやNginxに配置して起動した場合は表示されません。
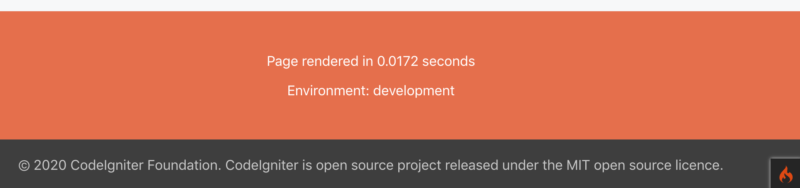
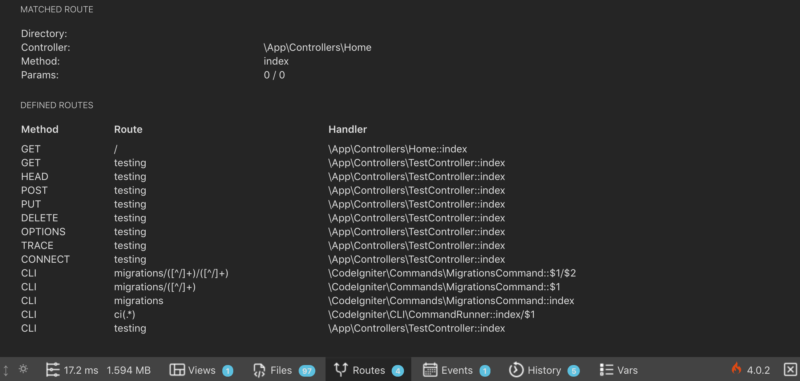
右下のボタンをクリックすると、デバッグツールバーが表示されます。処理時間やファイル、更に現在有効なルートの一覧などが確認できます。CodeIgniter3ではrouteの確認に少し手間が掛かっていたので、これは嬉しい機能です。
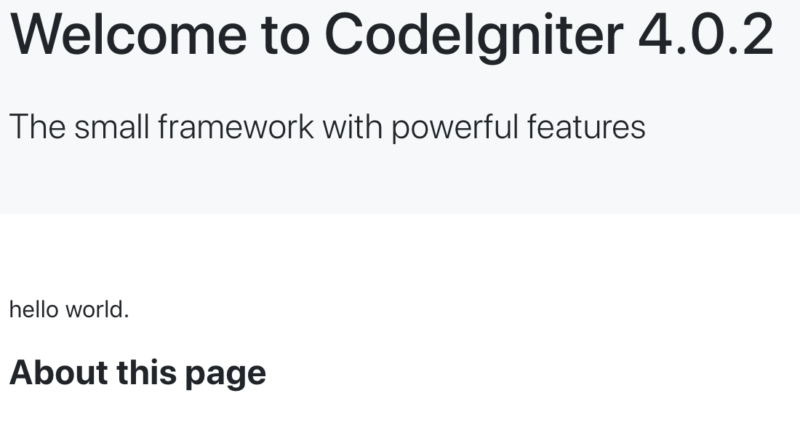
ハローワールド
既に最初の画面は表示されていますが、viewを少し編集してハローと表示してやります。
# vi project-root/app/Views/welcome_message.php<section>
<p>hello world.</p><!-- 追加 -->
<h1>About this page</h1>画面をリロードすると、控えめなハローが表示されました。
サーバーへの配置
サーバーへアップする場合、ローカル開発サーバーは使用できません。index.phpを公開ディレクトリに配置する必要があります。
publicフォルダへシンボリックリンクを作成
CodeIgniter3では、index.phpがルートディレクトリにあり、本体であるプロジェクトディレクトリを丸ごと公開ディレクトリに置く構造でした。
CodeIgniter4からは、index.phpはルートではなくpublicディレクトリの中に配置されています。そのため公開ディレクトリに置くのは、publicディレクトリだけで良くなっています。最も簡単なのは、非公開のディレクトリにプロジェクトディレクトリを配置し、publicディレクトリのみをシンボリックリンクで公開することです。
例えば、public_htmlディレクトリをpublicディレクトリにシンボリックリンクさせる場合は、以下のようにします。
# ln -fs project-root/public public_htmlPHPの勉強には、以下の書籍がとても参考になります。

詳細 : 著者: 小川 雄大 / 出版社: 技術評論社 / ページ数: 592ページ / 発売日: 2010/11/12
テキストよりも動画で集中して学びたい方はこちら。